The Manufacturers produce catalogues of all their available roof sheeting profiles.
Some profiles have wide, deep pans and can carry a lot of water.
And others, for instance all the corrugated types, can not carry much water at all.
And of course the steeper the roof slope, the more water can be carried.
This program calculates the maximum capacity of each individual roof sheet given the entered roof parameters.
Then calculates the actual flow on that sheet.
Can you see where this is going?
Subtract one from the other and we have the excess water carrying capacity (if any).
Surprisingly, it is possible to select a profile that won't work for the existing design flow.
If you see a negative available flow capacity, then you may have fallen into this trap, and it's time to select a bigger profile.
So we now know how many litres/sec we can put from our spreader on to each roof sheet.
From this, the program calculates the maximum catchment area of the upper roof that delivers this flow.
Doing it on a per sheet basis, ensures that there is no water overflowing the sheeting overlaps.
Supposedly this is a good thing.
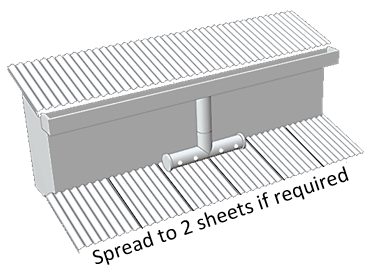
So when building the spreader, try to keep the discharge holes within about the centre 400mm of each roof sheet.
If one sheet is not enough, try discharging into two sheets with one spreader as shown in the picture.
This will allow you double the upper roof area given in this program. Two sheets will give twice the capacity.
If still not enough, try a larger lower roof prolile, or add more spreaders.
Sheet Length of the lower roof
This is taken as the longest sheet length from the ridge line to the gutter. Measured on the slope.
The overall sheet capacity does not change with a change of sheet length, as this is related to the cross sect area,
the rainfall, and the roof slope. Changing the length only changes the existing flow in the sheet.
Therefore the longest sheet gives the worst/max case of existing flow.
Meaning the user can then put the spreader anywhere on the lower roof and be safe.
For instance, if you drop a spreader 1/2 way down the existing sheet, from a side roof,
this will not change the existing flow in the lower sheet. (Unless there is no rainfall on the upper 1/2 of this sheet).
Rainfall Intensity
Eaves gutters are designed for a rainfall intensity of 5%, which is one in 20 year frequency.
However they must also be designed for an overflow capacity of 1% which is a one in a 100 year frequency.
This means that any rainfall intensity greater than once in 20 years must overflow over the edge of the eaves gutter.
But not necessarily down through the spreader. Because the spreader is designed for whatever is in the eaves gutter. i.e. 5% AEP.
However it may be worthwhile to check the capacity of the lower roof sheeting for a 1% AEP rainfall.
Therefore theoretically two calculations are required. One for 5%AEP for the spreader, and one for 1% AEP for the lower roof sheeting.
Sarking
Under AS/NZS 3500.3 Sarking is required for a distance of 1800mm either side of the point of discharge of the spreader.
The sarking is to be carried down to the eaves gutter.
The Next Step
Use the downpipe program to design the DP and gutter sizes,
Don't forget to add both contributing roof areas to design the lower gutter, and the overflow provisions.
It is the users responsibility to ensure the program is suitable for the purpose intended and that all data is entered correctly
as required by the program and the associated instructions.
Copyright Ken Sutherland 2024

 So we now know how many litres/sec we can put from our spreader on to each roof sheet.