NOTES on the SIMPLIFIED VERSION OF THE BOX GUTTER CALCULATOR
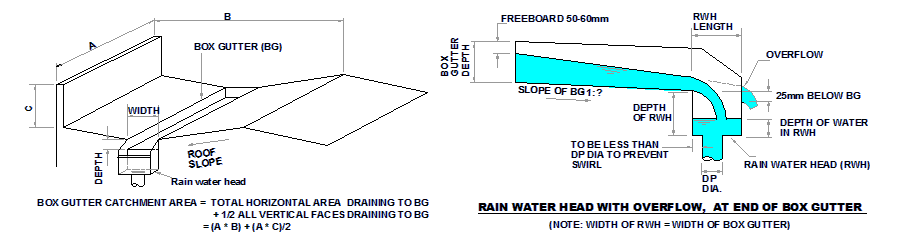
Draining to a Rain Water Head at the end of the box gutter
To AS/NZS 3500.3:2021 "Stormwater Drainage Acceptable Solutions".
Allowable Width, Slope, Height and Length of Box Gutters
Instructions & Notes:
This program incorporates a simplified version of calculating the roof catchment area, and makes no allowance for rain
shadow effects from vertical faces.
That is, if you decide to include vertical faces on all sides (refer below on how to do this),
Runoff will be calculated from all the faces at once. That is, rain will come from all directions at once.
This is not a problem, but may give you a box gutter slightly larger than required.
The other box gutter programs on this site calculate which is the worst rain direction by allowing shadowing effects from all the vertical faces.
For more information on rain shadow effects refer to
box gutter with vertical faces
Also, This calculation is only suitable when the box gutter drains to a
rainwater head, (with overflow) at the end of the box gutter, as shown.
For other conditions, eg a sump somewhere along the length of the box gutter, a
separate formula applies, usually resulting in a larger gutter.
Other Calculators
Note: The roof catchment area, is the total of all horizontal roof areas draining to all sides of the box gutter, Including half the area of any vertical faces that may run off into the box gutter.
Choose a location, or alternatively enter a known intensity for a 1 in 100 year rainfall, with a five minute time of concentration.
For New Zealand, you require a 1:50 year rainfall intensity, with a 10 minute time of concentration.
More information here.
Box gutter size
Choose a trial width of box gutter (minimum width is 300mm for commercial or
200mm for domestic). If this gives a depth of Box Gutter that is too deep for
the roof construction, try a larger width, etc etc.
The most efficient hydraulic shape is width = twice depth. This is what the code formulas are based on.
On top of this there is an allowance for freeboard, wave motion etc.
So do not deviate too much from the results shown.
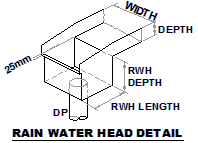
Critical Down pipe diameter & Rainwater head design :
The Plumbing Code has a requirement that the rainwater head depth should not be less than 1.25*Downpipe diameter.
This is dictated by a cryptic note, called note 1 on fig H2 (fig H2 is the diagram of the rainwater head shown above)
The note states:
"This figure (H2) applies for total depth of RWH >
= 1.25*downpipe diameter."
In the worked examples item J2.2(step 11) there is a requirement to adjust the RWH depth to comply with this note.
So the "Critical Diameter" shown in the calculator, is the diameter where the rainwater head depth = 1.25*DP dia.
This means that reducing this critical diameter will increase the rainwater head depth due to the orifice formula
requiring more head to push the water through.
However increasing this critical diameter will also increase the depth of the rain water head
due to the requirement that the rain water head depth must not be less than 1.25*downpipe dia.
So to make a long story short the "Critical Diameter" is the down pipe diameter that will give the shallowest rain water head for that
particular flow in the box gutter.
I believe that what is implied, is that if the depth of the rain water head
is reduced below 1.25 * DP dia. by using a larger down pipe, then the orifice formula no longer applies, and nor does the weir formula.
So best not to go there.
However in real life a bigger pipe carries more water, so it needs less depth in the rain water head to carry the same flow.
The water probably goes straight through the hole and doesn't need a formula. Anyway that's the code.
For very small flows, this diameter can be well below 50mm, and it is certainly not advisable to have a downpipe below this size,
as it is too easily blocked. In fact the relevant graph in the Code (fig I3) does not go below a flow of 3.6 L/s and a DP size of 90mm.
This program puts equations to those curves allowing any flow, or diameter, to be calculated.
Down pipes below 90mm dia should only be used on small awnings and the like, where overflowing will not cause any damage.
By the way if you have a flow greater than 16L/s the program reverts to formulas developed by the CSIRO and this requirement does not apply.
If you wish to play around with rain water heads without this restriction
try the
custom rainwater head calculator.
Anyway, moving on, use trial and error of all variables to obtain a result that suits the construction.
It is important that the dowwnpipe is positioned closer than one diameter to a side wall of the collector to prevent swirl.
Overflowing
Check out the notes on overflowing and fail safe design here,
Making overflow provisions
IMPORTANT NOTE
The code only allows for flows up to
16 litres/sec
total runoff in the Down pipe. It
recommends that if this figure is exceeded, more downpipes should be added, or
catchments reduced.
The graphs in the Code were confirmed by experimentation
only up to a flow of 16 litres/sec, and for this reason do not go beyond this
flow.
However my calculators are based on standard hydraulic formulas, weir,
orifice, trajectories, etc, with the constants adjusted to give an
answer consistent with the code. For this reason I believe that my formulas will
stay true regardless of the flow.
However if you choose to generate a PDF of the results, and if the flow is greater than 16 L/s
the formulas revert to formulas developed by the CSIRO Division of Building Research.
The printable version has full reference to the particular CSIRO document.
Also, the new National Construction Code (NCC) has provided a solution for us all.
Clause DV1, Under Roof Drainage Systems/Verification Methods/ states:-
(a) by calculation and certification by persons or organisations with recognised credentials in the design or testing of stormwater drainage systems; or
(b) by satisfying the required criteria when tested in accordance with a specified test method endorsed by a recognised certification body.
By the way I have checked my (code) formulas against the CSIRO formulas, and the differences are negligible. The gutter depth is the same. The rain water head is slightly deeper, (which corresponds to a slightly different orifice discharge coefficient. This could easily happen in the test apparatus, as it depends on how the downpipe was joined to the bottom of the rainwater head.) and the rain water head length slightly shorter. I put this down to the fact that the code works out the length of the RWH for a box gutter sloped at 1:200, and CSIRO for a box gutter of no slope. More slope - faster flow, more trajectory, greater rainwater head length. Either way, the trajectory still does not hit the far face of the collector.
If you are interested in going further and deeper check out my blog here
The calculations for your Records Plus the Extra Features.
The printout of the calculations allows you to enter Names, Addresses, Job numbers, Job Descriptions, or whatever text you desire. (all these fields are optional, and will disappear if nothing is entered.) The file is non colour, and spaced with large margins, especially at the top and bottom to allow printing out on letterhead if desired. (Also has no Internet references).
It will guide you through the process, and show what the final PDF will look like, before doing the PDF conversion.
There is plenty of opportunity for trial and error using the back button to change something.
Also there is no limit on the number of different PDF files that can be created in the allotted time.
These features can be activated on as many devices as you wish for the same price.
The PDF file shows the calculation steps, the results, summary, and Code references.
This file is ideal for your records, submission to the Local Authority, client, Builder, Architect, etc. (even a court of Law, but hopefully you won't find yourself in that situation).
Here is a typical design.
There are no special downloads or passwords or login required. These extra features will just simply work for the allotted time, provided you use the same computer and Browser.
The time remaining is also depicted unobtrusively in the top left hand corner.
P.S. Any text you add is not stored or used in any way, and is lost on exiting the browser.
Activating this feature also activates the "Extra features" function, and the ability to calculate sizes above 16 L/s. These results are also included in the final PDF file.
Activate now
Ken Sutherland
Bachelor of Technology
Member of the Institution of Engineers Australia.
DISCLAIMER: It is the users responsibility to ensure input data is calculated
and entered correctly, and that the program is suitable for the roof
configuration required.
OTHER HYDRAULIC CALCULATORS
If you find that the programs save you time or money, please feel free to share the happiness with me.