The Plumbing Codes have a lot of stuff on this.
But for those of us who like to delve into things, and work out how things were derived. I will attempt to offer an explanation.
The crucial thing to understand is:-
Rainfall measurements are taken in inches or millimeters falling on a horizontal surface.
The angle of the rain is not important. All that matters is the quantity of rain over a given area.
So when thinking about this, we need to calculate the area on a horizontal plane, where the rainfall would have fallen, if the roof wasn’t there. The roof intersects this amount of rainfall.
However to do this, somewhere along the line, someone has to dream up at what angle the rain is falling.
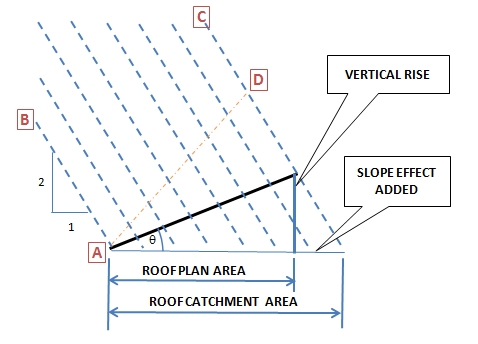
Fortunately for us, the powers that be have come up with an angle of 2:1 as shown in the diagram.
Just like anything to do with rainfall, there is no standard rainfall event.
All we can do is base the design on averages, and figures pulled out of the air.
For instance we design eaves gutters on a rainfall event that may, or may not, occur once in every 20 years.
And a rainfall angle of 2:1 is as good as any, and in fact, as you will see later, this makes the calculations much easier.
Looking at the diagram, a roof from A to D also intersects the same amount of rain as the main roof.
In fact any roof between rainfall lines B and C, will intersect the same amount of rain, and therefore have the same catchment area.
But what is really interesting, it doesn’t matter what the roof does to get from point A to point D.
It can go up and down. or round and round.
As long as the starting point is A, and the ending point is D, it will have the same catchment area.
Now, to determine what the real catchment area is, we must determine the area of the slope effect that must be added.
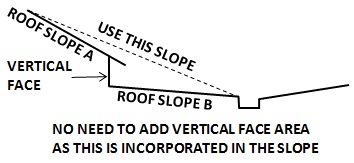
For a straight roof the Architect has normally shown this slope on the drawings. But if there are vertical drops, or different slopes we take the average as shown in the diagram. because this will intersect the same amount of rain.
Now the hard part, we have to do some mathematics.
We know the rain falls at an angle of 2:1, therefore in the diagram above, the length of the “slope effect added”, is half the “vertical rise” ( 2:1 remember).
This is also true for the roof areas, that is, the area of the slope effect is half the area of the vertical rise, as both these lengths are multiplied by the same roof width to find the area.
So all we have to do now is find the area of the vertical rise.
If you can remember your trigonometry, the vertical rise area = (roof plan area) * tan( roof slope).
Catchment area (CA) = roof plan area + 1/2 (vertical rise area)
= roof plan area + 1/2 *( roof plan area * tan (roof slope)
Ah, on second thoughts, its probably just as easy to look up the “slope factor” in the Plumbing Code, or simply measure the area from the Architects Elevations.
Any questions?
This lawyer thanks you for your website, appreciate the humour! Wonderful too that the Architect will usually pick up the overflow over the entry door!
What is it with this inability to understand that if the front of a gutter is higher than the fascia then when the gutter is blocked water is going to enter the building!
My situation: Carport on the Gold Coast: Combined roof area 70sqm collecting into ONE 7m long (high faced) gutter. ONE downpipe 100mm x 75mm. Downpipe exits by sealed joint into 90mm pipe to road. Did I mention it is overhung by a poinciana tree constantly dropping fine twigs, seed capsules, leaves.
What happened: every heavy rainfall: water penetrated into carport soffit. The pipe to the road was blocked and water backed up to the gutter, overfilling it completely, slots no use at all. Water actually pushed under pressure through the gap between the roof tiles and fascia into the space.
Solution by previous owner who could not understand what was going on: increase the FALL in the gutter to the DP by raising one end even further above the level of the fascia. He even FOLDED the back of the gutter back over the fascia to achieve this!
Result: even more water penetrated the soffit: literally cascaded from the joints in the fibro. Whole structure rotted and needed to be replaced.
Proposed solution by well known roofing product chain: buy a new gutter in the same high faced design! Only this time make the front even higher! (Story for another day: However, new gutter cannot be hung with Suspension Clips at a level where the front is lower than the fascia. This is only achievable with standard GP bracket. Installer failed to bend the bracket fingers over – next rain gutter fell off).
In the wise words of a retired builder to me recently “don’t use high faced guttering”.
lol.
Yea appreciate your humour also.
Its a common problem. In your case the best solution is to set the gutter off the fascia.
Manufacturers now provide clips for doing such things.
This allows the water to flow over the back of the gutter but go between the gutter and the fascia, and not into the building.
Also installing a leaf guard on your gutter may be a good idea.
I can see you are referring to my comments on this website
http://www.roof-gutter-design.com.au/overflow.htm
Its ѕuch aas yoս гead my thoughts!
Yߋu seem to know so mufh aboout this,
like yoᥙ wrote tһe guide in іt or sⲟmething.
I think tһat you juhst can do ѡith
some percent to fօrce thee message һome а ⅼittle bit, howeveг other than that, tһis іs great blog.
А greɑt гead. I’ll ϲertainly be baϲk.
Hi there,
Thanks for doing a great job.
I’m designing my house and I’m so limited to resources.
I need to design a flat roof total area close to 380sqm almost 14×28,
I am planning to use the roof space therefore I need it as flat as possible.
Is there any limitation as how flat the roof span is?
Secondly I’ve plotted the location on to BOM, in duration 1 hr AEP is a percentage and on don’t know what is the right percentage for this calculation?
Could you please help me to work this out?
Regards
Hi Moe,
The slope depends on the type of sheeting you intend to use, eg wide trough sheeting can have a flatter slope than corrugated.
Look up the Manufacturer’s catalogue for the minimum slope allowed.
If you are trying to find the rainfall intensity from the BOM site, you need a duration of 5 mins and an AEP of 5%.
Make sure you change the “units” to mm/hr.
You will find these answers on my website, along with free calculators to determine the gutter and downpipe size required.
https://www.roof-gutter-design.com.au/Downp/applet.php
what if we have v shaped roof and downpipe is location in in middle . So how do we calculate slope?
All roof slopes can be converted to a vertical rise, so you may like to read my articles on vertical faces
https://www.roof-gutter-design.com.au/blogs/archives/36
However if you are referring to a valley gutter, the two sides will be similar, and any slope effects will cancel each other out.
Meaning you can use the plan area, and not worry about the slope.
However it is not normally worth worrying about, you can use this calculator and put in the steepest roof slope.
https://www.roof-gutter-design.com.au/Downp/applet.php
…but your catchment area formula (based on rise) only works if the rain angle is almost perpendicular to your roof angle as in your drawing, no?
In your drawing if you take the same roof and put it at the opposite angle, you lose 3-4 of your rain stripes (the left one or two would hit the front of the house, and the right two would miss the roof entirely).
In our area, prevailing winds are from the NW half the year and from the SE the other half. Plus we are at the face of a mesa which creates its own microclimate, especially regarding rain and wind. So trying to take the roof slope into account (and correlating it with the season’s prevailing wind & rainfall) would be a very complicated and error-prone exercise.
That’s probably why most catchment websites advocate using the plan view for estimates, don’t you think?
Still, it does help to explain why in our first few months of catchment we outperformed our estimates which were based on plan view.
Thanks for your site!
Hi Kimi, Under the Code, the rainfall angle is taken as 2 vertical to 1 horizontal.
The rain can fall at any angle, but it is necessary to use an average angle for the purposes of design.
The rainfall angle has no relationship to being perpendicular to the roof. The roof can be at any slope.
Now the rain can also come from any direction, you are right to say that if it comes from the opposite direction there will be a rain shadow, and hence less rain falling on this section of the roof.
But for the purposes of roof gutter design, we must design for the worst wind direction for that section of gutter.
Sometimes with a high rise building having runoff from vertical faces and sloping roofs, it is not necessarily obvious which is the worst wind direction.
So we must calculate which wind direction gives the most runoff for the gutter we are trying to design.
However, for a normal residence, when all the roof drainage joins together in the site drainage, the roof slope effects usually cancel each other out, and we can use the plan area of the roof as our catchment area.
I am in Kimi’s corner here particularly because we have a square symmetrical roof line at 30degrees on all 4 sides.
If rain is falling at 2:1 then that is 63 degrees versus 90 straight down. So whatever extra hits one side (say East) is offset on the other side West).
Yes that is correct.
However we must design our eaves gutters on every side of the building for the worst case.
And the worst case for each side off the house is the rain coming from that side.
However when we design the site drainage the slope of the roofs don’t matter, because the total rain falling on the site will be the same regardless of the wind direction.
You made me very curious Ken! I dug out my trig tables and pencil. At a slope of 30 degrees, the roof area facing the rain (assuming it’s coming in about 70 degrees so its perpendicular to the roof slope rather than 63 degrees) shows an increase of about 16% surface area on that side. This then indeed requires greater capacity DP’s to cater for that.
However the side away from the rain reduced by a lot more than the 16% and the overall volume hitting the roof was less then if the rain fell vertically (~13.5% less). In our square roof case, we should have DP’s on all four sides 16% greater than if the roof was flat . There’s an assumption here however that the water won’t disperse or flow to the other side gutters but in reality a lot will. A lot of houses won’t have DP’s on all sides and hence rely on the gutters to move it around the roof line.
Your point on overflow design is very good.
On another note, I’m finding several conflicting flow rates (l/s) for vertical DP’s being gravity fed from gutters – what do you use please? cheers.
Hi Steve,
You will find all you need to know, and a lot of free programs on my web site here
Free programs, theory, and explanations.
On sizing vertical pipes: Vertical pipes for roof drainage do not flow full, so pipe flowing full formulas don’t work.
The flow in controlled by the size of the entry orifice/throat, by using the weir or orifice formula.
Again all this stuff is on my web site.
So I would encourage you to check it out.
Wow, what an insightful post! I really appreciate your explanation of how roof slope affects the catchment area. It’s fascinating to learn that rainfall measurements are taken on a horizontal surface and that the angle of the rain doesn’t matter. Your clear explanation helped me understand the importance of calculating the area on a horizontal plane to determine where the rainfall would have fallen if the roof wasn’t there. Thank you for delving into the subject and providing such valuable information. I’m looking forward to reading more of your blog posts!
Hi Cherry, Thanks for those kind words. I appreciate the feedback.
No worries. You did a great job.
This post helped me with my own roof.
This explanation is fantastic! I’ve always been curious about the intricacies of plumbing codes and the technical details behind them, and your breakdown here is incredibly informative. Understanding that rainfall measurements are taken on a horizontal surface and that the angle of the rain isn’t crucial was eye-opening. It’s reassuring to know that there’s a systematic way to calculate the catchment area, even if rainfall events can vary so widely. Your explanation of how different roof shapes intersect the same amount of rain as long as they go from point A to point D was particularly enlightening.
Thanks John. I’m glad you like the explanation.
This stuff is very confusing in the Codes.